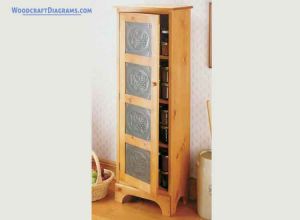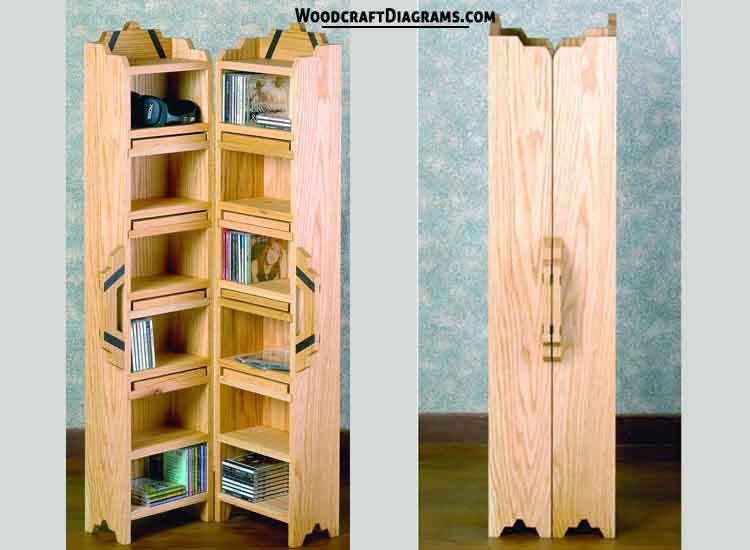
These media storage cabinet plans and blueprints will show you how to build a foldable case for housing your digital knick-knacks.
It has a compact and elegant design that is both practical and easy to construct.
Craft Sides Walls
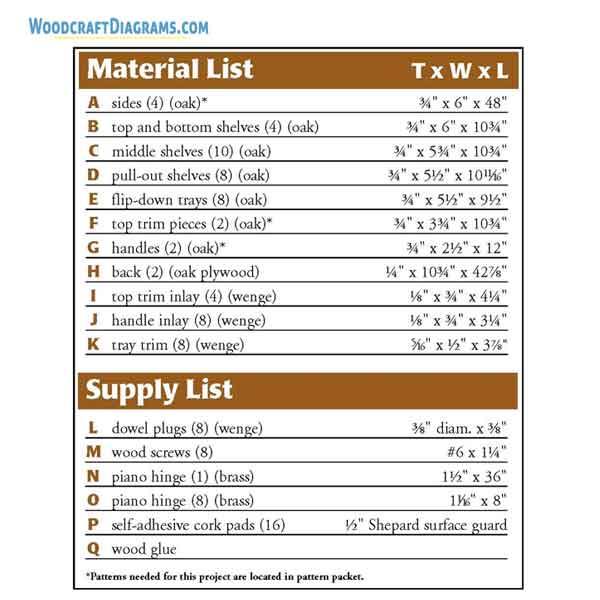
Cut the sides (A) to the dimensions given in the material list.
Cut a ⅜”-wide by ¼”-deep rabbet on the inside back edge of each side, as shown in photo A.
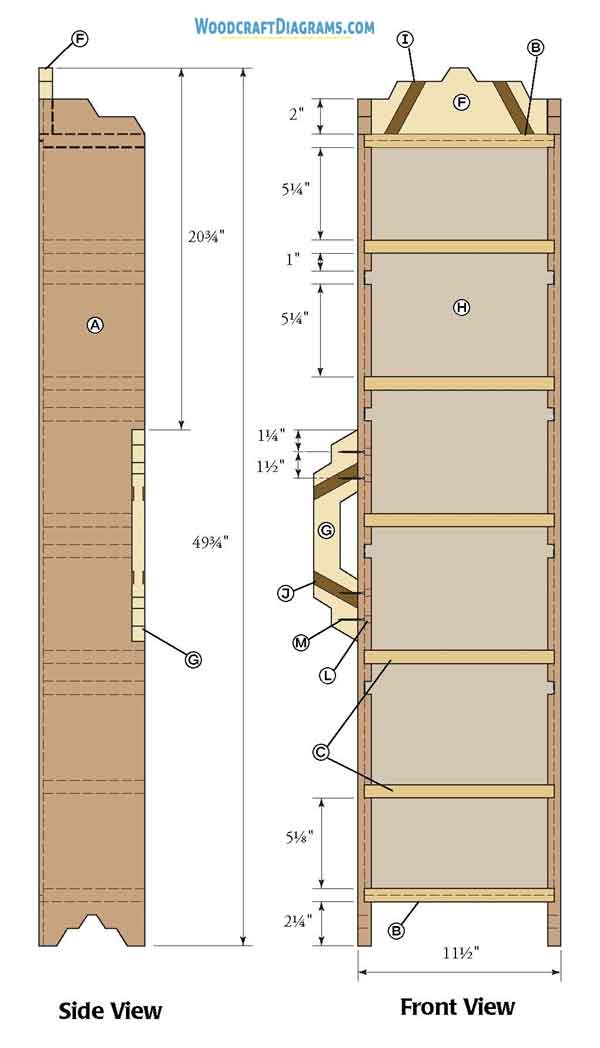
Cut Dadoes Measure and mark on the inside of the sides (A) the spacing for a series of eleven ¾”-wide by ⅜”- deep dadoes, as shown in photo B inset.
The first dado is 2″ from the top, and the second is 6″ below it.
Then there is a sequence of 1¾” and 6″ spacings.
The final dado is 5″ below the last of these, and 2″ from the bottom end.
Cut the dadoes, as shown in photo B.
Find the side top and bottom patterns in the pattern packet.
Cut them out on the band saw, as shown in photo C.
Be careful that the dadoes are on the inside face and that the top end of the side corresponds to the proper dado spacing.
An alternative approach would be to cut the end patterns, then cut the dadoes, which would mean reversing steps 2 and 3.
Trace Patterns
Cut the top trim pieces (F) and the handles (G) to the dimensions given in the material list.
Find the patterns for the top trim and handle in the pattern packet, and trace onto the wood, as shown in photo D.
Grain direction is important on these pieces, so you may find it helpful to make copies of the patterns onto a transparent media like mylar or tracing paper.
This allows for visibility of the wood.
Miter and Cut
Cut out the handle patterns on the band saw, using a wide blade to minimize sanding.
The handle is best cut using a combination of miter saw for the outside corners, then band saw for the rest, as shown in photo E and its inset.
Sand all the cut edges smooth.
The top trim pieces (F) are cut out on the band saw as shown in photo F.
Sand the edges smooth.
Cut Rabbets
Cut a ⅜”-wide by ½”-deep rabbet on the front edges of both ends of the top trim piece (F), as shown in photo F inset.
The ⅜”-wide by ¼”- thick tab that is left will fit into the rabbet cut in step 1 on the back edge of the sides (A).
Cut Inlay Slots
Using stacked dado blades totaling ¾” in width, cut ⅛”-deep slots at 30 degrees and ¾” from the bottom outside front edges of the top trim pieces (F), as shown in photo G.
A similar cut is made on the handles (G), but at 1½” from the outside edges and on both the front and back, as shown in photo G inset.
Cut the top trim inlay (I) and the handle inlay (J) to the dimensions given in the material list.
Trim to fit in the slots cut in step 8, and glue in place, as shown in photo H.
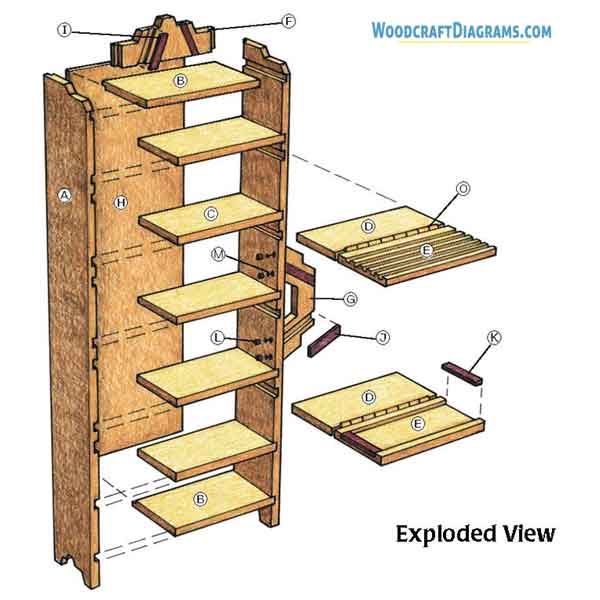
Assemble Carcase
Cut the top and bottom shelves (B) to the dimensions given in the material list.
Cut a ¼”-deep by ⅜”-wide rabbet in the back edge of each.
Cut the middle shelves (C) to the dimensions given in the material list.
Assemble the carcase of the case using glue (Q), as shown in photo I and inset.
Place the top and bottom shelves in position, making sure that the rabbet is placed in the rear to receive the back.
The middle shelves are placed in the upper of the double dado, leaving the lower empty to receive the pull-out shelves.
Cut the back (H) to the dimensions given in the material list.
Attach it to the carcase with glue and brads, fitting it into the pre-cut dadoes, as shown in photo J.
Attach the top trim piece (F) with glue, as shown in photo K.
The tab will fit into the pre-cut dado on the top of the sides.
Attach Handles Glue and clamp the handles into place on the carcase, as shown in photo L.
The bottom of the handle should be 17″ from the bottom of the cabinet side, with the first screw hole 1″ above.
A second screw hole is drilled 1½” above the first.
A second pair of holes is drilled 7″ above into the other part of the handle.
Attach with screws (M), the heads of which are inset ⅜”.
Cut plugs (L) to the dimensions given in the material list.
Glue into place over the inset handle screw heads, as shown in photo M.
Sand the plugs flush.
Cut the flip-down trays (E) to the dimensions given in the material list.
These can be custom cut to your particular needs.
To hold CD’s, cut a series of five 7⁄16″-wide by 5⁄16″- deep grooves across the length of the tray, starting 9⁄16″ from the front edge and 7⁄16″ apart, as shown in photo N.
For a handy snack (or hold anything) tray, remove the 7⁄16″-wide material left standing between the slots, as shown in photo N inset.
Attach Trim
Cut the tray trim (K) to the dimensions given in the material list.
After the material is removed from the snack type flip-down tray, as described in step 17, the trim can be glued onto the ends, as shown in photo O.
The use and location of your case should dictate how these trays are designed.
Cut and Hinge
Cut the pull-out shelves (D) to the dimensions given in the material list.
Cut the piano hinge (O) into eight 8″ lengths with a hack saw, as shown in photo P lower inset.
Hinge the pull-out shelves and flip-down trays together in pairs, as shown in photo P.
Attach a pair of self-adhesive cork pads (P) to the hinge, as Attach Hinge shown in photo P upper inset, to help level the flip-down tray.
Flush the cabinets together face-to-face and attach the piano hinge (N), as shown in photo Q.
The wood was left natural with a satin polyurethane finish to match a stereo cabinet.
Oil and wax would be a fine alternative.